

Original Post


How to use the worldbuilder (with pictures)
Hello.
This is a thread for answering to question
Firstly, just something about the worldbuilder first. There isn't too much about it, so don't worry.
Worldbuilder.lua was made by NewbLuck and released in Toribash version 3.0. Before that admins and MrPoptart had the beta of 3.0 and made a few mods for start.
In the very first version of worldbuilder, you could do objects and adjust their mass, length, width, rotation, is it static, instagib or can you grab it, plus color.
Well, eh, you could do the most with it except the movement stuff. Got it?
I don't really know why did I type this, but anyways. I don't care, let's just continue.
As you can tell by the name of the file, worldbuilder is a .lua feature.
So, to start with worldbuilder.lua, select Options from the menu, then choose Scripts. In the bottom of the .lua script list (might not if you have done/downloaded scripts), there is worldbuilder.lua. Click it.
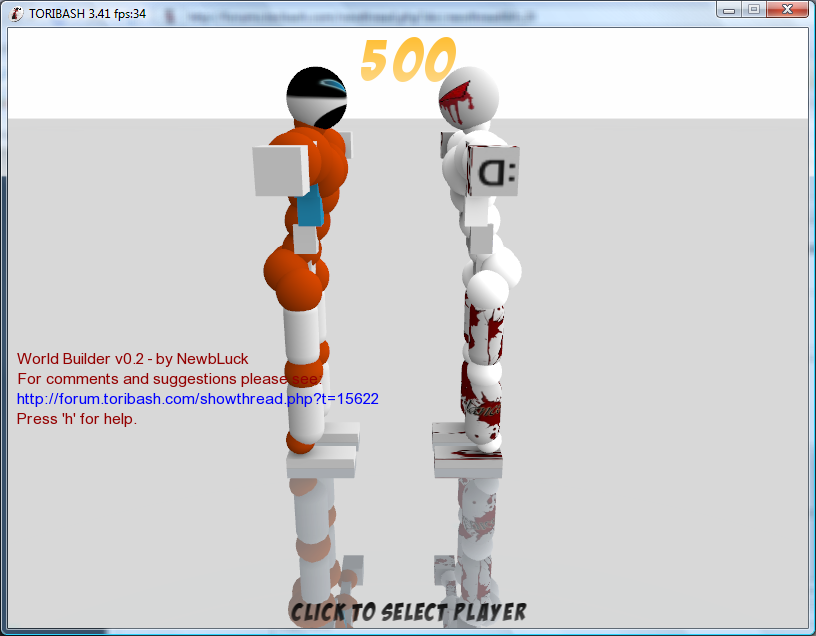
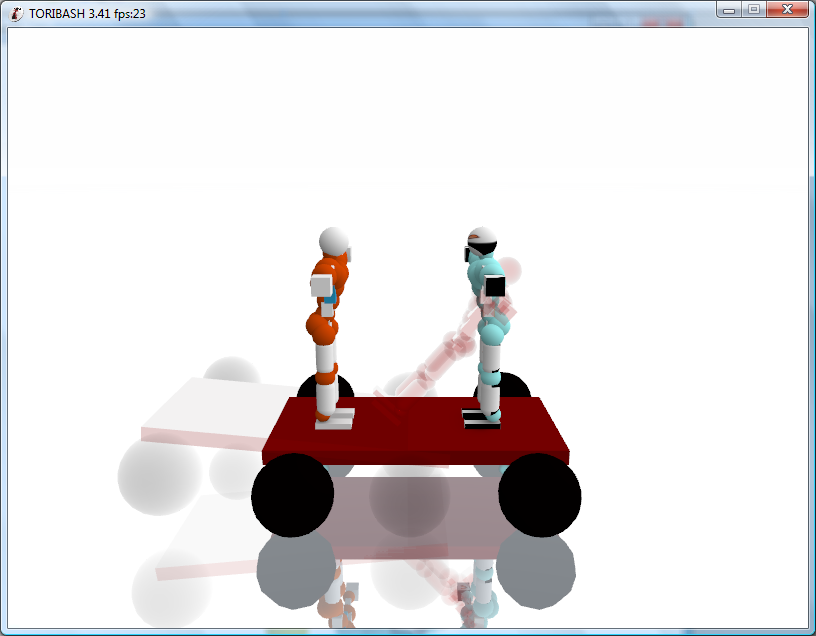
Congratulations, you have now opened worldbuilder.lua. It should look like this.
From the picture, you probably noticed that the ground has turned gray.
This is the area where you have to fit your objects in.
It shouldn't be too hard.
And, remember that you can have only 12 objects with the normal version of worldbuilder.
Brain112 made a new version of worldbuilder which can hold up to 16 objects.
So, thank him too.
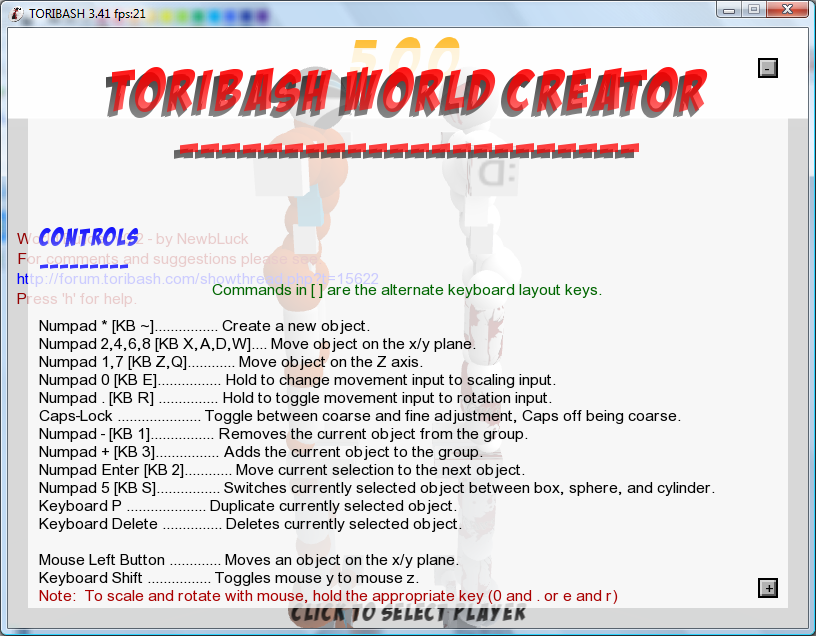
Firstly, you may want to check the controls by pressing h.
If you have a laptop without Numpad, you may want to press K first to change the keys to the keyboard keyboard instead of Numpad keyboard.
The keys for keyboard keyboard will be shown in brackets.
So, let's start exploring the worldbuilder by creating an object by pressing *. (~) (Notice that if you have a different keyboard (like Finnish or Swedish), you have to press the Ї button to create an object.)
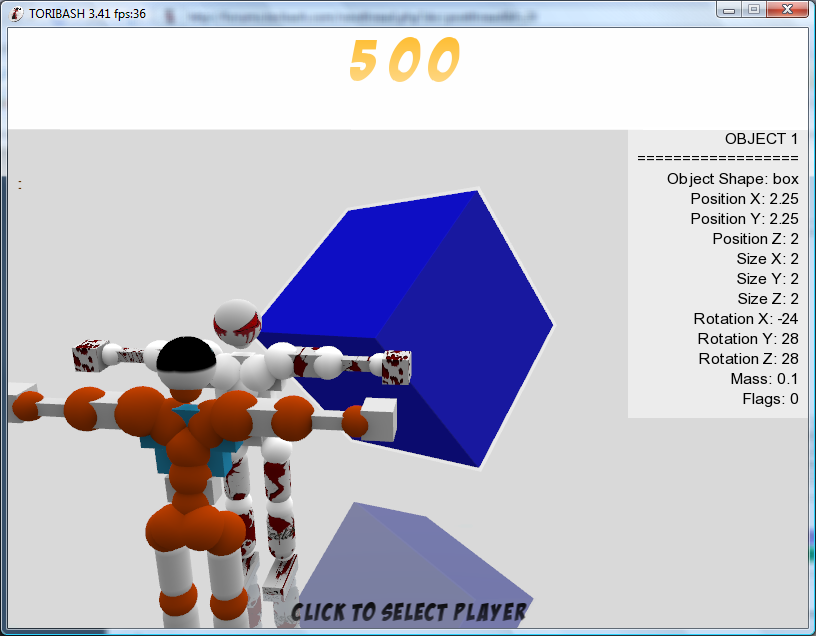
There should appear between Tori and Uke a blue box, which is half inside the ground. To the left, there will appear the info about your object.
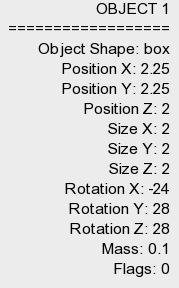
Object Shape - What shape your object is (box, cylinder or sphere)
Position X - In what position your object is on x plane
Position Y - In what position your object is on y plane
Position Z - In what position your object is on z plane
Size X - How big your object is on x plane
Size Y - How big your object is on y plane
Size Z - How big your object is on z plane
Rotation X - Your object's rotation on x plane
Rotation Y - Your object's rotation on y plane
Rotation Z - Your object's rotation on z plane
Mass - How heavy your object is
Flags - More information below... Much below.
If you don't want to use the info, press I to hide it.
This is the Object. You can have fun with this. A lot.
You can move the object on the x/y plane by using the Numpad arrows (W,A,D,X).
For moving the object z axis AKA higher or lower, you have to press Numpad 7 for higher (Q) and 1 for lower (Z).
To stretch the on x/y plane, hold Numpad 0 (E) and use the Numpad arrow keys (W,A,D,X) to stretch it.
From the angle of the first picture, press Right (D) to stretch it and Left (A) to shorten it. Remember, this is the angle of the first picture, in the opposite angle you have to press Left to stretch the object and Right to shorten it. To make the object higher, you have to do the same thing except that you press 7 for higher (Q) and 1 for lower (Z).
Rotating the object goes the same scheme as stretching the object, except that you hold Numpad . (R). From the angle of the first picture, hold . and press Up (W) to make the object bend left on x/y plane and press Down (X) to bend the object right.
Using the 7 (Q) and 1 (Z) buttons makes it rotate on z axis.
Change the shape of the object by pressing 5 (S). You can change them between box, cylinder and sphere.
Now that you have played with one object enough now, let's make another one by pressing Numpad * (~, Ї) and play with it.
Sometimes it might be annoying to do the same move for your every object over and over. To make this easier, the genius NewbLuck has added an option to add an object to a group.
While you're on the new object, press Numpad - (1) to remove it from the group. You can see which objects are in group by that they are solid. The objects which aren't in a group are transparent. When an item isn't in a group, you can't do anything with it, except copy and delete it. You have to add it in a group if you want to play with it.
To make the object back in group, press Numpad + (3)
WARNING!!!
If you want to modify only one object, make sure it's the only one which is in the group! It happens to many modders that they forget other objects in the group and your changes modifies all the other objects.
To swap the object, press Numpad Enter (2).
You may have noticed that the movement of the objects is pretty coarse. To make it fine, press Caps Lock. Much smoother movement!
Now that you master forming the object, now that it's time to... I don't know, but it includes mass, color and flags. It's actually pretty easy.
Let's start off with mass.
Press M to bring up the mass modifying panel.
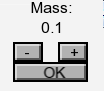
Mass 0.1 might sound light, but it isn't. If you are going to plan to make a weapon mod, don't use this weight. If you want a weapon weight, you have to modify the mass from the Notepad. Don't worry, the mod file isn't confusing and you can edit the Notepad file easily. You should be able to discover the Mass in there.
But yeah, the max mass is 20, which is pretty heavy.
To change the color, press C.
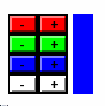
This is simple to use, too.
You probably noticed that all objects start off with the blue color.
You probably first want to make the color black before you get on the color what you want. To change the color to black, just press the blue - button some times enough it's pure black.
To add red, press the red + button.
To add green, press the green + button.
To add blue, press the blue + button.
The white buttons are actually transparency buttons. To make the object transparent, press white -. To make the object solid, press white +.
Open the flags modifying panel by pressing F.
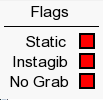
Static means that the object flows on air and can't be moved. The flag number for this is 8.
Instagib makes the object instagib. The flag number for this is 6.
No grab makes the object ungrabbable. The flag number for this is 16.
This is a thread for answering to question
How to use the worldbuilder.lua?
Firstly, just something about the worldbuilder first. There isn't too much about it, so don't worry.
Worldbuilder.lua was made by NewbLuck and released in Toribash version 3.0. Before that admins and MrPoptart had the beta of 3.0 and made a few mods for start.
In the very first version of worldbuilder, you could do objects and adjust their mass, length, width, rotation, is it static, instagib or can you grab it, plus color.
Well, eh, you could do the most with it except the movement stuff. Got it?
I don't really know why did I type this, but anyways. I don't care, let's just continue.
worldbuilder.lua
As you can tell by the name of the file, worldbuilder is a .lua feature.
So, to start with worldbuilder.lua, select Options from the menu, then choose Scripts. In the bottom of the .lua script list (might not if you have done/downloaded scripts), there is worldbuilder.lua. Click it.
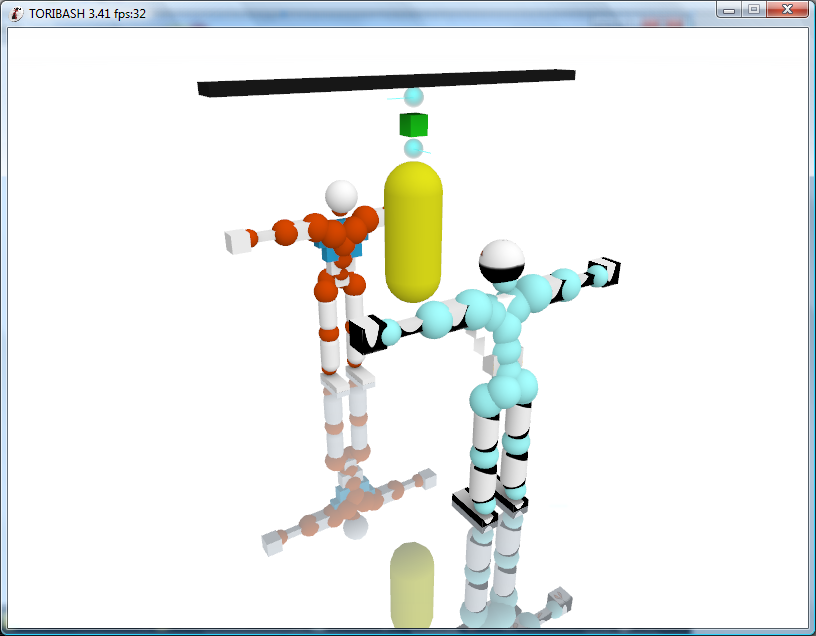
Congratulations, you have now opened worldbuilder.lua. It should look like this.
Objects
From the picture, you probably noticed that the ground has turned gray.
This is the area where you have to fit your objects in.
It shouldn't be too hard.
And, remember that you can have only 12 objects with the normal version of worldbuilder.
Brain112 made a new version of worldbuilder which can hold up to 16 objects.
So, thank him too.
Firstly, you may want to check the controls by pressing h.
If you have a laptop without Numpad, you may want to press K first to change the keys to the keyboard keyboard instead of Numpad keyboard.
The keys for keyboard keyboard will be shown in brackets.
So, let's start exploring the worldbuilder by creating an object by pressing *. (~) (Notice that if you have a different keyboard (like Finnish or Swedish), you have to press the Ї button to create an object.)
There should appear between Tori and Uke a blue box, which is half inside the ground. To the left, there will appear the info about your object.
Object Shape - What shape your object is (box, cylinder or sphere)
Position X - In what position your object is on x plane
Position Y - In what position your object is on y plane
Position Z - In what position your object is on z plane
Size X - How big your object is on x plane
Size Y - How big your object is on y plane
Size Z - How big your object is on z plane
Rotation X - Your object's rotation on x plane
Rotation Y - Your object's rotation on y plane
Rotation Z - Your object's rotation on z plane
Mass - How heavy your object is
Flags - More information below... Much below.
If you don't want to use the info, press I to hide it.
This is the Object. You can have fun with this. A lot.
Moving and modifying the object
You can move the object on the x/y plane by using the Numpad arrows (W,A,D,X).
For moving the object z axis AKA higher or lower, you have to press Numpad 7 for higher (Q) and 1 for lower (Z).
To stretch the on x/y plane, hold Numpad 0 (E) and use the Numpad arrow keys (W,A,D,X) to stretch it.
From the angle of the first picture, press Right (D) to stretch it and Left (A) to shorten it. Remember, this is the angle of the first picture, in the opposite angle you have to press Left to stretch the object and Right to shorten it. To make the object higher, you have to do the same thing except that you press 7 for higher (Q) and 1 for lower (Z).
Rotating the object goes the same scheme as stretching the object, except that you hold Numpad . (R). From the angle of the first picture, hold . and press Up (W) to make the object bend left on x/y plane and press Down (X) to bend the object right.
Using the 7 (Q) and 1 (Z) buttons makes it rotate on z axis.
Change the shape of the object by pressing 5 (S). You can change them between box, cylinder and sphere.
Now that you have played with one object enough now, let's make another one by pressing Numpad * (~, Ї) and play with it.
Sometimes it might be annoying to do the same move for your every object over and over. To make this easier, the genius NewbLuck has added an option to add an object to a group.
While you're on the new object, press Numpad - (1) to remove it from the group. You can see which objects are in group by that they are solid. The objects which aren't in a group are transparent. When an item isn't in a group, you can't do anything with it, except copy and delete it. You have to add it in a group if you want to play with it.
To make the object back in group, press Numpad + (3)
WARNING!!!
If you want to modify only one object, make sure it's the only one which is in the group! It happens to many modders that they forget other objects in the group and your changes modifies all the other objects.
To swap the object, press Numpad Enter (2).
You may have noticed that the movement of the objects is pretty coarse. To make it fine, press Caps Lock. Much smoother movement!
Mass, color and flags
Now that you master forming the object, now that it's time to... I don't know, but it includes mass, color and flags. It's actually pretty easy.
Let's start off with mass.
Press M to bring up the mass modifying panel.
Mass 0.1 might sound light, but it isn't. If you are going to plan to make a weapon mod, don't use this weight. If you want a weapon weight, you have to modify the mass from the Notepad. Don't worry, the mod file isn't confusing and you can edit the Notepad file easily. You should be able to discover the Mass in there.
But yeah, the max mass is 20, which is pretty heavy.
To change the color, press C.
This is simple to use, too.
You probably noticed that all objects start off with the blue color.
You probably first want to make the color black before you get on the color what you want. To change the color to black, just press the blue - button some times enough it's pure black.
To add red, press the red + button.
To add green, press the green + button.
To add blue, press the blue + button.
The white buttons are actually transparency buttons. To make the object transparent, press white -. To make the object solid, press white +.
Open the flags modifying panel by pressing F.
Static means that the object flows on air and can't be moved. The flag number for this is 8.
Instagib makes the object instagib. The flag number for this is 6.
No grab makes the object ungrabbable. The flag number for this is 16.
Last edited by Tonakai; Sep 21, 2008 at 08:44 AM.
Movement
There isn't any keys about this in worldbuilder, so you have to edit your mod via Notepad(++).
Let's take an example.
...Toribash-3.41\data\mod\punchbag.tbm
Open the file with Notepad.
The text in there is pretty messed up, so you might want to clean it.
Though, if you are too lazy for it, you could download the mod from the bottom of this message again. I have cleaned it up already.
(Damn the one who left it like that)
Yeah, so, there are the instructions already how to do movement to the object, even though the joints are relaxed.
If you want some movement like in crazycars.tbm, then, let's look inside the simplecar.tbm.
Open the mod with Notepad.
By looking in the env_obj_joint part, you probably understand at least something about that.
So, for forced joints, there's just added strenght and velocity. Nothing special.
If you don't understand what are the axis, strength and velocity stuff, read below.
A mod in Notepad
Here are the explanations of the sides and pos stuff, which you probably have been wondering.
world color - The color of the world. The numbers goes like Red Blue Green
gravity - The gravity. The numbers goes like x y z
Notice: If there's any three readings after the thing, they are the x, y and z axis.
friction - Friction on or off. Off means there isn't any friction, on means it's like normal.
player 0/1 - 0 is Tori, 1 is Uke
body (r/l_)[part] - Bodypart. R/L means left or right.
joint (r/l_)[joint] - Joint.
shape - The same as with object; is the joint/part box, cylinder or sphere.
sides - The sides of the object. X is the front and the back, y is the sides and z is the bottom and the top.
pos - Position. Where the object is.
force - How much force does the object have.
color - The color of the object.
material - Material. There can be flesh and steel. The material just changes the voice when it's being hit.
flag - I wish someone could give me a list of these... I haven't used them, soo...

radius - I don't get this either.
axis - Does the joint move in x, y or z axis.
range - How far can the joint move.
strength - I don't get this either.
velocity - I don't get this either.
rot - Rotation of the object.
mass - How heavy the object is.
visible - Is the environment joint visible or not.
env_obj number - Environment object.
env_obj_joint number env_obj 1 env_obj 2 - Environment object's joint.
Funny stuff you should really read:
So, there has recently been a bit too many repeated questions, so I decided that there should be their own section for them.
Q: worldbuilder.lua doesn't appear in the Scripts menu! How can I get it?
A:
Originally Posted by culapou

WORLDBUILDER IS IN 3.8, TO LOAD IT TYPE /LS WORLDBUILDER.LUA
+rep to culapou
Q: I've heard of a worldbuilder with 16 objects. Is this true?
A: Yes, it is. And the download link is here.
Overwrite the current worldbuilder.lua in ...Toribash-3.8\data\scripts and enjoy the 16 objects!
Woot.
Well well, that's all.
When you want to save, just press Enter, and then type the name, and then Enter again.
To load a mod, press l and type there the name of the mod.
The mod which you are about to load has to be in the Script folder.
Thanks, I hope this tutorial helped you.
Special Thanks
NewbLuck
For making the worldbuilder
Brain112
For adding four objects more for the worldbuilder, which makes the full of 16 objects
NewbLuck
For making the worldbuilder
Brain112
For adding four objects more for the worldbuilder, which makes the full of 16 objects
Last edited by Tonakai; Jul 29, 2009 at 05:22 PM.
